Creating expressions for filters and lists in Liaison EDD
November 12, 2014 Leave a comment
One of the more powerful features of Liaison Messenger EDD is the ability to control various actions on a conditional basis. This ranges from sending unique email text to different recipients to creating routing preferences based on specific recipient criteria. Various types of expressions are used to achieve the desired results. In this article we will cover some of the most common uses of these expressions and provide examples. This is by no means a complete list of all the possible options. If you have a specific need our support department can assist in developing a solution.
Let’s start by defining some of the commonly used operators and functions.
= : Equal to
== : Used when an exact comparison of character strings is needed
<>, # : Not equal to
$ : Comparison, Seeks one character expression within another.
ALLT : Removes all leading and trailing spaces
IIF : Returns one of two values depending on the value of a logical expression
LEFT : Returns a specified number of characters from a character expression, starting with the leftmost character.
RIGHT : Returns the specified number of rightmost characters from a character string.
INLIST : Determines whether an expression matches another expression in a set of expressions.
UPPER : Returns the specified character expression in uppercase.
FILTERING OF ACTION LINES
In some cases an action line may need to be suppressed or only executed for a specific instance. An expression can be added under the Filtering tab of the Output section of the Script Ply Configuration.
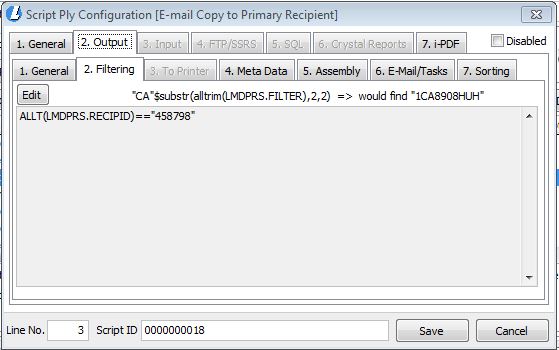
Clicking the Edit button will open the Expression Builder. The LMDPRS table contains the data captured from the Data Identifier Tokens (DITs) within each page of the document being processed. The filter criteria is based on this data. The Fields list contains each of the fields from this table.
Any field captured in the DITs can be used in a filter. This could be reading the primary recipient preference stored in LMDCMS.DEFPREF or looking for a unique value from the document. If stored in the user defined 1 DIT the field would be LMDPRS.USERFLD1 for instance.
In this example the filter is set to only execute this action line when the recipient ID is exactly equal to “458798”.

Additional examples
1a. Process when recipient ID is one of the following using .OR. separator and exactly equal to (==):
ALLT(LMDPRS.RECIPID)==”458798″.OR.ALLT(LMDPRS.RECIPID)==”687541″.OR.ALLT(LMDPRS.RECIPID)==”158455″
1b. When evaluating for not equal to with this method use .AND. as the separator.
ALLT(LMDPRS.RECIPID)<>”458798″.AND.ALLT(LMDPRS.RECIPID)<>”687541″.AND.ALLT(LMDPRS.RECIPID)<>”158455″
2a. Process when recipient ID is one of the following using comparison ($):
ALLT(LMDPRS.RECIPID)$”458798,687541,158455″ (separate comparison value with comma and no spaces inside quotes)
2b. This can be reversed by placing NOT ( ) or ! on front of the expression.
!ALLT(LMDPRS.RECIPID)$”458798,687541,158455″ NOT(ALLT(LMDPRS.RECIPID)$”458798,687541,158455″)
3a. Process when recipient ID is one of the following using INLIST:
INLIST(ALLT(LMDPRS.RECIPID),”458798″,”687541″,”158455″) (values in quotes separated with comma)
3b.This can be reversed but placing NOT or ! on front of the expression.
!INLIST(ALLT(LMDPRS.RECIPID),”458798″,”687541″,”158455″) NOT(INLIST(ALLT(LMDPRS.RECIPID),”458798″,”687541″,”158455″))
POPULATING RECIPIENT LISTS
Expressions can also be used while building recipient lists. This can be a simple expression concatenating two fields or it can be a more involved IIF expression. Double clicking a field on the Field Linkage tab will open the expression builder.

To combine values from two fields use one of the concatenation symbols.
1. Using ‘+’ as the concatenation symbol joins the elements. This example joins the employee first (John) and last name (Smith) separated with a space.
allt(vTWO_EDDEmployee.FRSTNAME)+” “+vTWO_EDDEmployee.LASTNAME
John Smith
2. When “-” is used it removes trailing blanks from the element preceding the operator then joins two elements. This example joins the customer number (123456 ) with the ship to ID (ST15)
vTWO_EDDCustomer.CUSTNMBR-vTWO_EDDCustomer.SHIPTOID
Result: 123456ST15
IIF expressions can be used to return one of two values based on the result of a logical expression. This example looks for @ in the source data field containing the email. If more than one exists the email address is populated. If not a static email address is entered.
IIF(ATC(“@”,Vtwo_eddcustomer.email)>1, Vtwo_eddemployee.email,”accounting@internalemail.com”)
This example sets the preference to emailed if the value is the source data field is “Email”. If not it then looks for “Fax” and sets the preference to Faxed. Otherwise the preference is set to Printed if the field does not contain Email or Fax. (4 is the internal value for Email, 3 for Fax, 2 for Print)
The value is forced to upper case to ensure a proper match.
IIF(UPPER(ALLT(Vtwo_eddcustomer.Userdef2))=”EMAIL”,4,IIF(UPPER(ALLT(Vtwo_eddcustomer.Userdef2))=”FAX”,3,2))
Additional functions can be found in the Expression Builder during the creation of any expression. The Verify button will check the syntax.
These examples represent only a portion of what can be accomplished. If you need assistance with these expressions or a more involved solution please contact us.